Menu
admin
add-account
# https://sysadminxpert.com/managing-user-accounts-and-permissions-in-linux/
sudo useradd john_doe
sudo usermod -c "John Doe" john_doe
sudo userdel john_doe
# reset password
sudo passwd john_doe

# service account
sudo useradd -r -s /sbin/nologin myserviceaccount
sudo passwd -l myserviceaccount
add-group
sudo groupadd developers
sudo usermod -aG developers john_doe

# remove group membership
sudo deluser john_doe developers
set-krb
# list the DC
dig -type=srv _gc_.tcp.$zdom_fqdn

# fill /etc/hosts
sudo vi /etc/hosts

# install the krb5-user service
sudo apt install krb5-user

# edit /etc/krb5.conf
sudo vi /etc/krb5.conf

# reconfigure krb5-user service
sudo dpkg-reconfigure krb5-config

# tshoot /etc/krb5.conf
kinit
net ads info
realm list
klist -k /etc/kr5.keytab
set-netconf
sudo vim /etc/netplan/01-netcfg.yaml
# set the DHCP option from true to false
sudo netplan apply
sudo systemctl restart networking

# change the MAC address
cat /usr/share/wireshark/manuf | grep -i Dell
sudo ifconfig eth0 down
sudo ifconfig eth0 hw ether E4:B9:7A:98:A1:12
sudo ifconfig eth0 up
set-ssh
ssh-keygen -t rsa -b 4096 -C "your_email@example.com"
ssh-copy-id user@hostname
vi /etc/ssh/sshd_config
# set => PasswordAuthentication no
sudo systemctl restart sshd
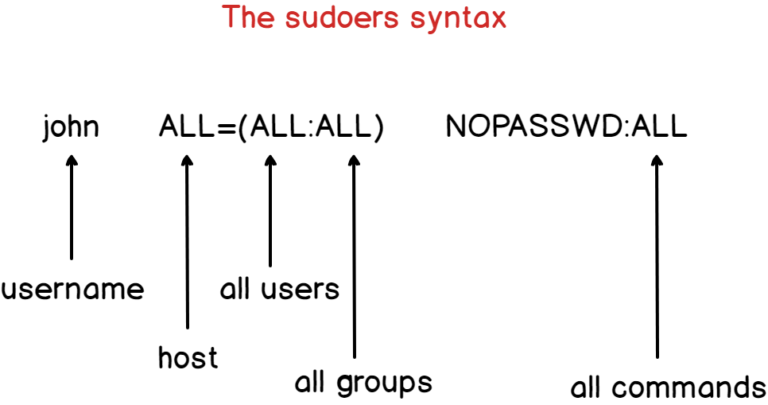
set-sudoers
 opsec: hackingarticles - sudo LPE
set-vpn
cd /etc/openvpn
# run the vpn
sudo openvpn --config xxx.opvn

# check the public ip while using the vpn
watch curl https://api.myip.com
set-rdp
unset-fw
clean-history
echo "" > ~/.zsh_history
echo "" > ~/.bash_history
audit
audit-fs-perms
find /home/ -type f -size +512k -exec ls -lh {} \;
find /etc/ -readable -type f 2>/dev/null
find / –perm -4000 -user root -type f
find / -mtime -0 -ctime -7
find / -atime 2 -ls 2>/dev/null
find / -mtime -2 -ls 2>/dev/null

/home/<user>/.ssh/authorized_keys
/home/<user>/.bashrc
audit-logs
lastlog
cat /var/log/lastlog
grep -v cron /var/log/auth.log* | grep -v sudo | grep -i user
grep -v cron /var/log/auth.log* | grep -v sudo | grep -i Accepted
grep -v cron /var/log/auth.log* | grep -v sudo | grep -i failed
grep -v cron /var/log/auth.log* | grep i "login:session"
enum
get-cpu
uptime
free
df
cat /proc/meminfo
cat /proc/mounts
get-history
history
cat /home/$USER/.*_history
cat /home/$USER/.bash_history
cat /root/.bash_history
cat /root/.mysql_history
cat /home/$USER/.ftp_history
get-kb
get-netconf
$ netstat -rn
$ route

# network card
ip link
ifconfig

# arp table
arp -a

# listening socket
sudo netstat -nap
lsof –i

# network connections
netstat -ntaupe
netstat -ano
netstat -nap
netstat -antp
netstat -antp | grep "ESTAB"

watch ss -tt

# dns
cat /etc/hosts
cat /etc/resolv.conf
get-os
date
cat /etc/timezone
uname -a
uname -m
cat /etc/*-release
hostname
cat /etc/hostname
echo $PATH
get-processes
lsof -p [pid]
ps -eo pid,tt,user,fname,rsz
ps -aux
ps aux --sort=-%mem | head -n 10
top
htop
vmstat -s
pstree
get-scheduled-tasks
crontab -u root -l
cat /etc/crontab
ls –la /etc/cron.*
tail -f /etc/cron.*/*
cat /etc/cron.daily
cat /etc/cron.hourly
cat /etc/cron.monthly
cat /etc/cron.weekly

/etc/cron*/
/etc/incron.d/*
/var/spool/cron/*
/var/spool/incron/*
get-sessions
w

# last-sessions
last | grep -v 00:
get-services
# List all services and their current states.
chkconfig --list

# Show status of all services.
service --status-all

# List running services (systemd)
systemctl list-units --type=service

more /etc/hosts
more /etc/resolv.conf

# service daemons
/etc/init.d/*
/etc/rc*.d/*
/etc/systemd/system/*

/etc/update.d/*
/var/run/motd.d/*
get-shares
get-users
echo $USER
passwd -S <USER>

cat /etc/passwd
cat /etc/group
cat /etc/shadow
cat /etc/sudoers

# dfir
grep :0: /etc/passwd
enum-sec
get-apt-history
zcat /var/log/apt/history.log.*.gz | cat - /var/log/apt/history.log | grep -Po '^Commandline.*'
get-boot-integrity
# STEP 1: create the checksum file, run the command:
find isolinux/ -type f -exec b1sum -b -l 256 {} \; > isolinux.blake2sum_l256

# STEP 2: check binaries against the checksum file
b1sum -c "${dirname}".blake2sum_l256
get-krb-config
- display the keytab file:
cat /etc/krb5.keytab echo $KRB5_KTNAME - display the service configuration file:
cat /etc/krb5.conf echo $KRB5_CLIENT_KTNAME - list valid tickets in memory:
klist -k -Ke
get-status-fw
iptables --list-rules
get-status-proxy
# https://www.shellhacks.com/linux-proxy-server-settings-set-proxy-command-line/
echo $HTTPS_PROXY
echo $HTTP_PROXY
echo $FTP_PROXY
get-sshd-logs
harden
disable-llmnr
# UBUNTU
# Edit the line LLMNR=yes to LLMNR=no in /etc/systemd/resolved.conf
nano /etc/systemd/resolved.conf
install-procdump
wget -q https://packages.microsoft.com/config/ubuntu/$(lsb_release -rs)/packages-microsoft-prod.deb -O packages-microsoft-prod.deb\n
sudo dpkg -i packages-microsoft-prod.deb
sudo git clone https://github.com/Sysinternals/ProcDump-for-Linux.git
install-procmon
wget -q https://packages.microsoft.com/config/ubuntu/$(lsb_release -rs)/packages-microsoft-prod.deb -O packages-microsoft-prod.deb\n
sudo dpkg -i packages-microsoft-prod.deb
sudo git clone https://github.com/Sysinternals/ProcMon-for-Linux.git
install
archive-servers
Look for packages to download:
check-iso
# STEP 1: Download a copy of the SHA256SUMS and SHA256SUMS.gpg files from Canonical’s CD Images server for that particular version.
# STEP 2: install the Ubuntu Keyring. This may already be present on your system.
sudo apt-get install ubuntu-keyring
#
# STEP 3: Verify the keyring.
gpgv --keyring=/usr/share/keyrings/ubuntu-archive-keyring.gpg SHA256SUMS.gpg SHA256SUMS
# STEP 4. Verify the checksum of the downloaded image.
grep ubuntu-mate-18.04-desktop-amd64.iso SHA256SUMS | sha256sum --check
# STEP 5. If you see “OK”, the image is in good condition.
ubuntu-mate-18.04-desktop-amd64.iso: OK
resize-lvm
# INFO : Solve KALI 2021.1 LVM default install. VG-ROOT is 10GB.
# step 1 : uumount /home. Run as root. System may refuse operation if users logged on or services running from /home.
umount /home
# step 2 : shrink old /home partition to X GB, (system will force you to check filesystem for errors by running e2fsck)
e2fsck -f /dev/mapper/vg-home
resize2fs /dev/mapper/vg-home XG
# step 3 : Reduce vg-home to X GB
lvreduce -L 20G /dev/mapper/vg-home
# step 4 OPTION A : Add 100G to the vg-root
lvextend -L+100G /dev/mapper/vg-root
# step 4 OPTION B :Extend vg-root to  100G
lvextend -L100G /dev/mapper/vg-root
# step 5 : grow /root (ext3/4) partition to new LVM size
resize2fs /dev/mapper/vg-root
mount /home